

How To Set Up Ceiling Fan Remote Control
How to Install a Ceiling Fan Remote
Upgrade your fan with a ceiling fan remote.
Introduction
Former ceiling fans may accept inconvenient pull bondage, make noise or demand repairs. I easy fix is to install a ceiling fan remote control. You may also demand to replace broken parts.
Tools Required
Materials Required
- Capacitor
- Ceiling fan switch
- Remote control for ceiling fan
- Wire nuts
Project step-past-step (6)
Pace 1
Calculation new ceiling fan remote controls: Check the fit
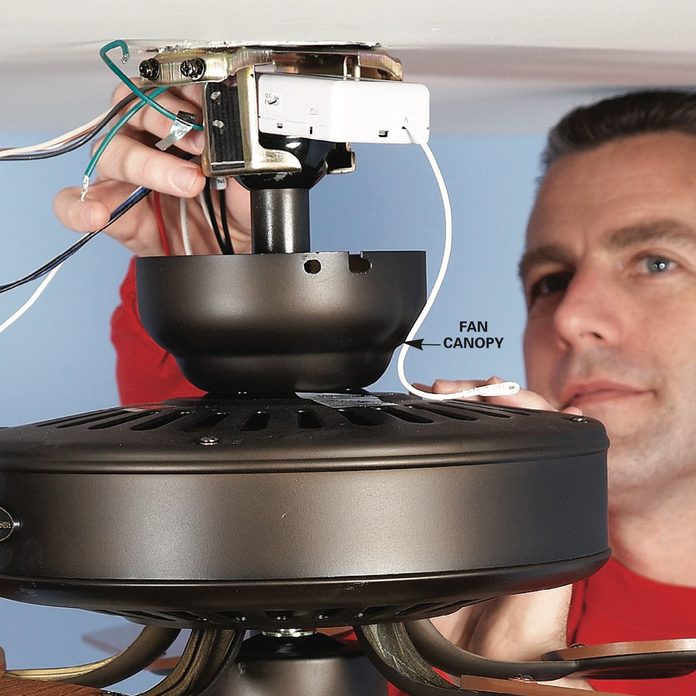
In this easy DIY project, we'll show y'all how to alter a ceiling fan by adding a remote. For starters, slide the ceiling fan remote receiver into the space to a higher place the down rod. If it doesn't fit, try other locations inside the canopy.
How to Remainder a Ceiling Fan
Footstep ii
Set the transmitter
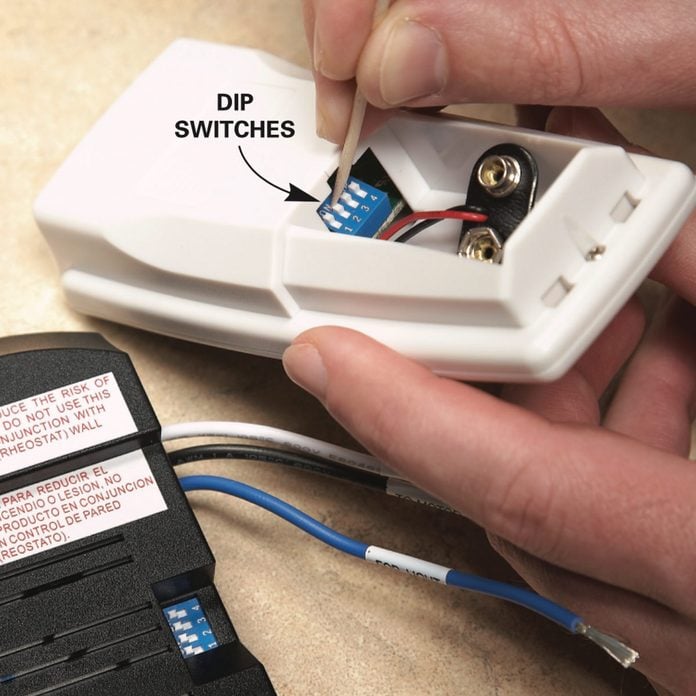
Flip the DIP switches to change the transmitter frequency if you have bug with interference. The switch positions on both ceiling fan remote units must friction match.
There are many "universal" ceiling fan remote control kits on the market for overhead fans controlled by pull chains and a singe wall switch. All of them characteristic on/off and fan speed control. Others also offer light-dimming and thermostatic control capabilities. Only whether you can use a ceiling fan remote kit depends on the corporeality of free space inside the fan canopy.
Many "ceiling hugger"–style fans accept enough free space for the receiver for the ceiling fan remote. Merely "downward-rod" styles may non. Shut off the excursion breaker to the fan and lower the canopy (use a voltage sniffer to make sure the ability is actually off). Bank check the fit of the receiver before you commit to wiring it in permanently. Keep your receipt just in case.
With the power off, connect the hot and neutral wires to the "Air conditioning-in" wires on the receiver. And then connect the three remaining wires to the fan and lite (they're labeled by the manufacturer).
If you have neighbors nearby, you may accept to change the frequency on the ceiling fan remote transmitter and receiver to forestall you or your neighbors from controlling one another'south fans.
With Ceiling Fans, You Get What Y'all Pay For
![]()
Step three
Fixing ceiling fan problems: Remove the capacitor
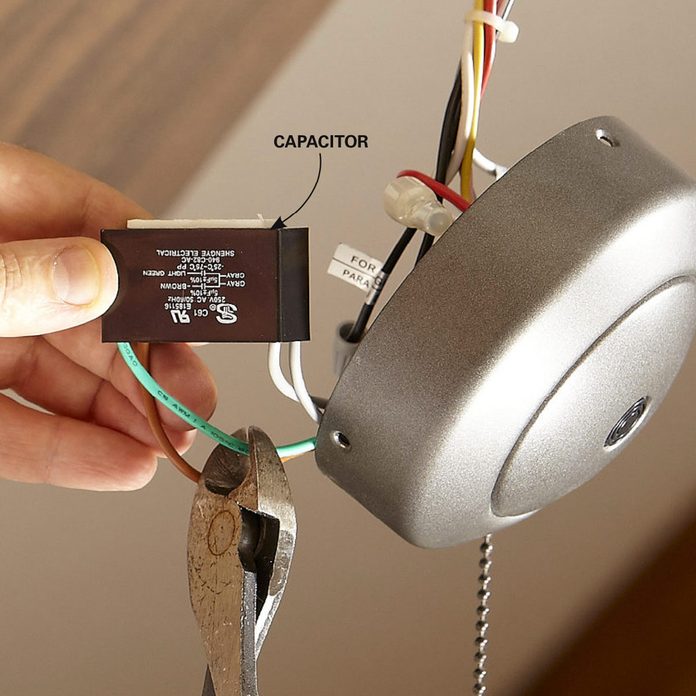
Reach into the housing and gently pull out the capacitor. Untangle it from the other wires. Then cut the capacitor atomic number 82 wires one at a time, or remove the wire nuts and cutting off the wire strands.
How to Set up a Wobbly Ceiling Fan
Footstep iv
Shop for a new capacitor and switch
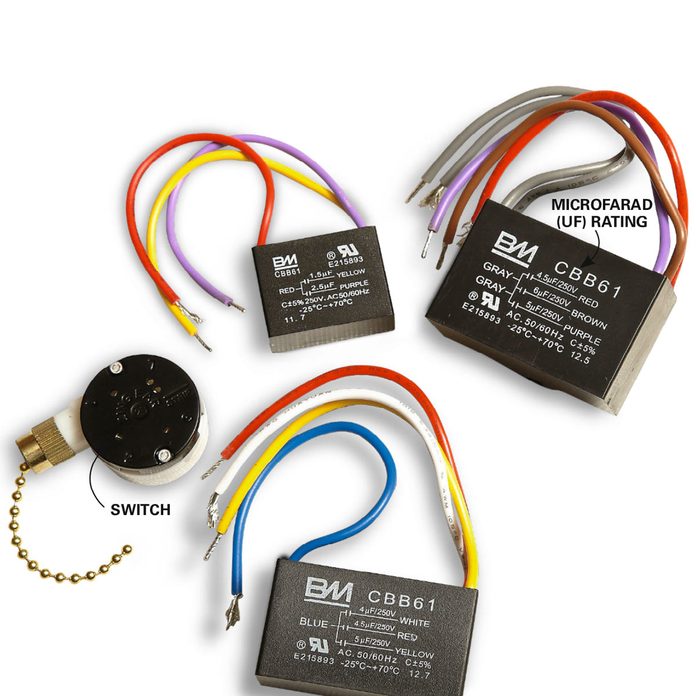
Note the number of wires and the microfarad (uf) rating on the sometime capacitor. Purchase a new i with the same number of wires and uf rating.
How to Install Ceiling Fans
Pace v
Insert the capacitor, then the wires
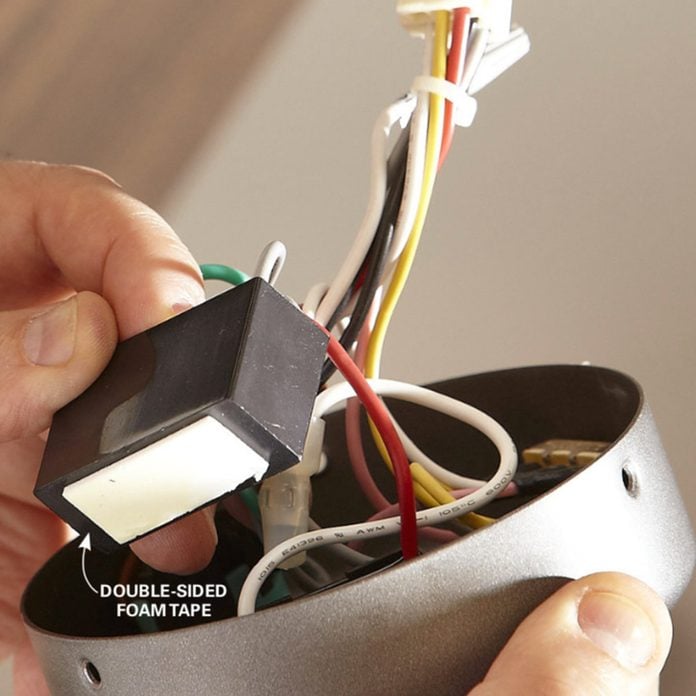
Apply double-sided foam record to the capacitor and stick information technology to the housing cap. Then pack the wires into the center, making sure the wire nuts stay connected.
A ceiling fan can run nonstop for years without a hint of a problem. And then, out of the blueish, it can quit completely, stop working on some speeds or start making a loud humming audio. Y'all may think the motor is shot, merely it's probably not. Those are all symptoms of a burned-out capacitor. The capacitor and the pull chain switch are the only two components that control the fan speeds. Switches rarely wear out. But they tin break if you pull the concatenation besides hard or it gets defenseless in the blades. You can hedge your bets and supersede both the capacitor and the switch in less than an hour for about $twenty. Here's how.
Starting time by shutting off the power to the fan and the lights (if equipped). You'll have to gain access to the housing where the speed and management switches are located. In fans without lights, just remove the bottom cover. Double-cheque the power with a voltage sniffer before you stick your fingers in the housing. If your fan has lights, remove the globes and bulbs. Then remove the calorie-free kit. That'll expose the wiring in the housing.
Next, remove the capacitor. A burned-out capacitor might have a burned smell, swollen sides or scorch marks. Those are certain signs it's bad. Merely even if yours appears to be in good shape, replace it anyway considering it's notwithstanding the near probable cause of your speed/humming problem. If y'all have any doubts about the fan switch, replace it, besides. Remove the pull-concatenation switch past unscrewing the knurled outer knob. Pull the switch into the housing and disconnect the wires. Take both pieces to a ceiling fan or appliance parts shop to go replacements. If you don't have a local source for parts, go to eceilingfans.com. Click on the "Capacitors" or "Wall Switches" tab to match each to a replacement. Finish the job past connecting the new parts and tucking everything back into the housing.
Choosing a Whole House Fan
Step half-dozen
Fixing A Ceiling Fan Remote Control
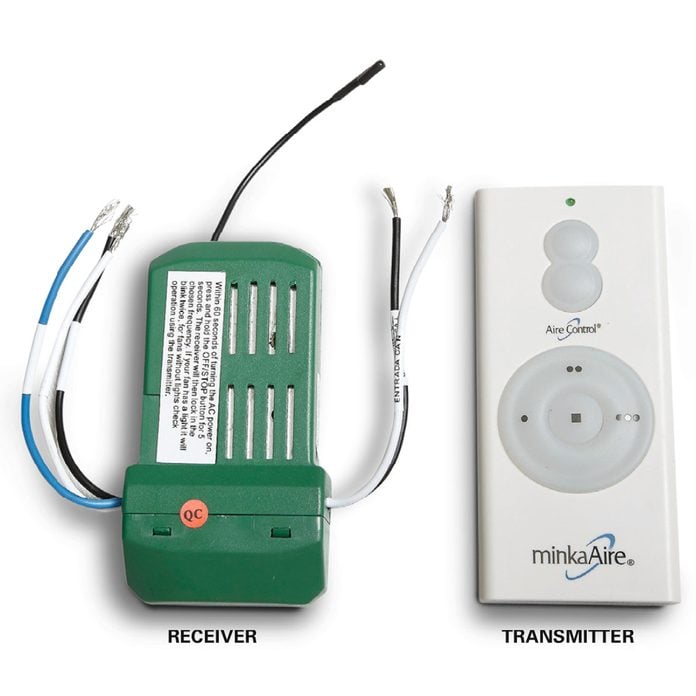
Ceiling fans with mill remote controls don't utilise traditional capacitors to control fan speed. The remote receiver varies the voltage and electric current to change the fan motor speed. Just ceiling fan remote control units can go bad too. Before you even recollect about trigger-happy the fan apart to diagnose a problem, replace the batteries in the transmitter first. So press the transmitter buttons to run across if the LEDs calorie-free upward. If you're not sure whether the problem is in the transmitter or receiver, yous can transport both units to eceilingfans.com for testing (testing and repair usually run about $25). The receiver is usually tucked into the fan's mounting bracket, which is connected to the electrical box.
This Fan Trick Tin Keep Your Firm Warm All Winter Long
Originally Published: December 17, 2022
Source: https://www.familyhandyman.com/project/how-to-install-a-ceiling-fan-remote/
0 Response to "How To Set Up Ceiling Fan Remote Control"
Post a Comment